Easter Egg Cake Balls

- Easter Egg Cake Balls

This is one of my older, but favorites so I’m reposting one of my favorites for Easter. These were a big hit and I’m sure I’ll be making them again this year!
Although I don’t quite get it as I guess I’m just not that much of a cake fan, cake balls are very popular around here and I do have to admit these are pretty cute. I mentioned to college Daughter that I was going to make some and her exact words were “send them here, send them all here” and I’ve made them for several friends, who all seem to love them. I did have some cheesecake pops at a party recently and those are going to be my next batch as they were amazing.
The basic idea is simple, mush up a cake and icing, roll it and dip in chocolate. The best site for ideas is Bakerella, she even has a cookbook out just for them. Previously I made some simple chocolate ones for a birthday party following Bakerella’s instructions. This time I used a cherry chip cake mix (I usually make my cakes from scratch, but Daughter had left this box of mix here from her last visit so I decided to use it) and some cream cheese icing I had leftover from a birthday cake.

- Ingredients

Ingredients:
Cherry Chip Cake mix with eggs and oil (or homemade cake)
1/2 cup chopped maraschino cherries (added to the cake batter for a little extra flavor)
2 cups cream cheese icing (homemade or purchased)
Dipping chocolate white and dark (I prefer Ghirardelli’s candy coating because I think it has the best quality but it’s not always easy to find. Sam’s Club carries it around the holidays so I stock up but you can also use chocolate melts which you can even get pre-colored)

- Cake

First bake the cake and cool completely.

- Crumbled Cake

The crumble the cake in a large bowl.

- Adding the icing

Add the icing.

- Cake and icing mixed up

Smash it together and form into a thick disk – a spatula works but hands work better. Wrap in plastic and put in the refrigerator for about an hour to stiffen up.

- Best spoon for making the balls


- Making the eggs

This is a great spoon for making the balls or cookies. It is a hard plastic with a rubber bottom so the portions are even and you can easily push the dough out. It comes in several sizes and I’ve seen it at most kitchen stores, the grocery store and even at the dollar store. For this, I used the Tablespoon size, rolling them into egg shapes and placing them on a cookie sheet.

- Eggs rolled

As you can probably tell, I’m not into perfection, I just don’t have time or the patience. I admire those who do and if you are one of them, you can make them really great. Some of my eggs aren’t shaped exactly right but they still look pretty egg like and they don’t last long anyway.

- Wrap and freeze

Next wrap and place them in the fridge for 10-15 minutes.

- Stand


- Dipping


- Tapping off the excess


- Hardening

I have tried two methods of dipping, using a toothpick and putting them on a styrofoam floral stand that I got from the dollar store and just using a fork and putting them on waxed paper. I find that the fork works better for me but they each have good and bad parts. In order to get them to stay on the toothpick, I had to freeze them, which then caused the chocolate to crack as it hardened but they seemed to have the best shape if you can keep them on the toothpick. Any little drips on the bottom can be trimmed with a sharp paring knife.

- Fork Dipping

I switched to “warmer” balls on the fork letting them harden on a piece of waxed paper, which seemed to solve the falling off/cracking problem and seemed to be faster. It sometimes leaves a bit of a flat base, but that is easily trimmed with a sharp paring knife or you can just leave it and serve them with that side down. I used both white and dark chocolate, adding gel food color to the white to make a couple different colors. Make sure you keep the chocolate warm, if it starts to thicken heat for a few seconds in the microwave to keep it easier to dip. When it gets thick it also makes them more likely to crack (I’ve learned these things from the error part of trial and error). The good news is that I learned the decorating can cover up the cracks pretty well!

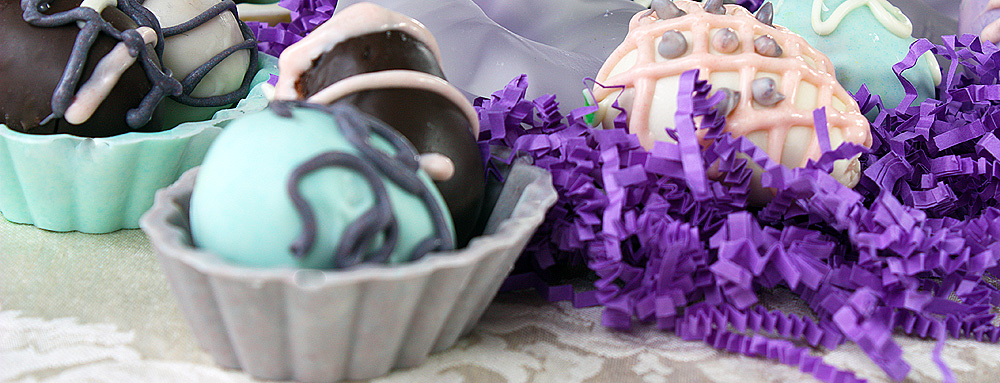
- Decorating

Here they are after the first round of decorating. Note there are cracks and not so perfect spots, but those will be fixed soon! I used the spray on color on some of the white ones which made a sort of marbled effect that I liked. I tried someone’s suggestion for painting corn syrup on then putting sprinkles, but I just didn’t like the way it looked and am not that much of a sprinkle fan anyway so I ended up using the colored white chocolate instead. Plus, that worked perfectly to fill in any cracks. I always use a small plastic squeeze bottle when decorating with chocolate, you can get them from Wilton at the craft store or pretty much anywhere and they are very inexpensive. Just melt the chocolate in a small bowl in the microwave. Depending on how much you do at a time it can take from 1-2 minutes. I start with 1 minute, then stir and do 15 second increments until it is melted, then pour it into the squeeze bottle.

- Looking Better

Again, those of you who are more creative and have more patience could do a much better decorating job.

- Molding and trimming the chocolate baskets

I also used a chocolate mold (from Wilton that I got at Wal-Mart) to make some little baskets. You just melt the chocolate, put it into the bottom of the mold then put the top. Using the same sharp paring knife I trimmed off any excess before I unmolded them as sometimes it was hard to judge just how much chocolate to put into the mold – the directions on the package just say fill “half full” but there are no markings so you just have to get a feel for it.

- Eggs in Baskets
Here are a couple in the baskets.